The previous version of the traction control worked. That was the problem. It worked well enough to make a 1,114 whp Supra feel calm, so the remaining faults were hidden inside a system that never looked obviously broken.
Then I logged it properly. The logs showed that the tyre produced its best acceleration at less slip than some of my more permissive modes allowed, the speed offsets could drive the final target below zero, and the integral term was storing positive torque while the car was below target. When wheelspin arrived, part of the PID was briefly helping it.
This is the latest iteration: what changed, what the evidence actually supports, and what still needs a warm, dry road before I call it finished.
The starting point
Status: Verified – Rear tyres are 295/30/19 Continental SportContact 7s.
The strategy has always had two halves. Feedforward predicts the engine torque the tyre should accept. Closed loop PID then corrects whatever the prediction could not know about: temperature, damp patches, surface changes, load transfer and bumps.
The torque model is normalised to third gear. The traction strategy itself is not normalised until the final gear scaler is applied. That distinction matters because a torque value in the base table is not the engine torque the car will necessarily receive in second, fourth or fifth.
The tyre peak moved the targets
Status: Working conclusion
The useful result from the earlier dry data was a tractive force peak around 9,500 to 9,800 N at roughly 5 to 6 percent slip. Once slip moved into the 6 to 8 percent band, median tractive force fell to about 8,860 N. More wheelspin felt more dramatic, but it accelerated the car less.
That immediately made two settings look wrong. Mode 7 allowed 7.9 percent straight line slip and Mode 9 allowed 12 percent. Both sat beyond the measured force peak. They were permissive, but they were not the fastest settings.
The later road test complicated the picture. It was cooler and the road was not completely dry. Maximum logged tractive force was about 7,982 N rather than 9,500 N. The road rose by only about 0.17 percent over the measured section, worth roughly 30 N on a 1,750 kg car, so gradient could not explain the difference. Tyre and road condition could.
That means 9,500 N remains a dry baseline, not a universal grip limit. The system still needs slip feedback because no fixed torque table can know whether the tyre is warm, cold, dry or sitting on a damp seam.
Rebuilding the rotary modes
Status Calibration loaded for validation
The rotary still selects the character of the car, but the straight line targets now have a cleaner progression. Mode 3 remains the chilled setting. Mode 4 is the normal fast road setting. Mode 5 is for a known dry road on warm tyres. Mode 6 allows movement, but no longer asks the SC7 to live well beyond its measured force peak.
| TC Mode | Use | Previous 0 G target | Revised 0 G target |
| 1 | Snow and ice | 2.0% | 2.0% |
| 2 | Damp and cold | 2.0% | 2.5% |
| 3 | Chilled | 2.8% | 3.0% |
| 4 | Sporty road | 3.8% | 4.0% |
| 5 | Known dry roads | 7.9% | 5.5% |
| 6 | Track | 12.0% | 7.0% |
| 7 | Very permissive | 20.0% | 10.0% |
| 8 | Soft off | 28.0% | 28.0% |
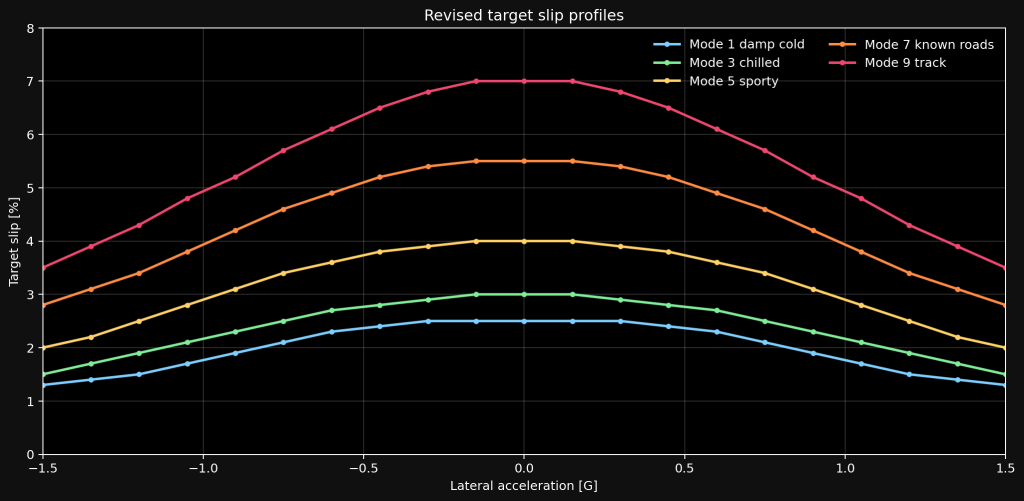
The lateral G shapes were rebuilt at the same time. Both sides are now symmetrical because there was no evidence supporting different left and right targets. Every active road mode tapers as lateral acceleration increases, because the tyre has less longitudinal capacity available while it is also producing cornering force.
The speed offset was doing too much
Status: Calibration loaded for validation
The final target is the lateral G table plus a speed offset. The old high speed offsets were large enough to make the combined target negative in the conservative modes. Unless that is correcting a measured wheel speed bias, a negative slip target has no useful meaning.
The revised table keeps the low speed launch allowance, but reduces the 25 km/h addition from nine percentage points to five. The target now blends down towards the normal table by 45 km/h instead of falling off a cliff. Above 180 km/h the negative offsets remain, but they are smaller and cannot erase the underlying target.
That gives the same rotary a consistent meaning at every speed. Mode 3 remains conservative rather than becoming impossible at high speed, and Mode 7 remains the quickest dry road target rather than turning into an arbitrary number once the car passes 180 km/h.
A feedforward table built around tractive force
Status Current baseline
The largest architectural change is the main feedforward surface. Instead of treating slip error as the only description of available grip, the new table is indexed by modelled tractive force and engine torque before reductions.
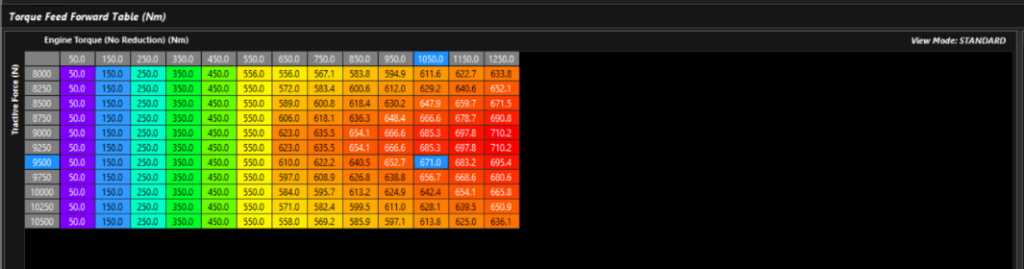
The surface rises towards 9,500 N, then deliberately falls away. At a 950 Nm unrestricted torque input, the table returns 594.9 Nm at 8,000 N, 652.7 Nm at 9,500 N and 597.1 Nm at 10,500 N.
Apply the fourth gear normalisation factor of 1.263 and those become approximately 751, 825 and 754 Nm at the engine. The peak is therefore almost exactly where the warm, dry SC7 data said it should be. Above the peak, the table asks for less torque because the tyre has already moved onto the wrong side of its force curve.
This is still a model. Emtron tractive force is largely derived from engine torque and gearing; it is not a strain gauge measuring the contact patch. The table provides a gear aware first estimate. Slip feedback remains the part that discovers the road is wet.
The integrator was adding torque
Status: Verified defect
The most important log finding was not a lack of negative integral authority. It was positive windup.
With slip below target, the original controller allowed the integral output to climb to its positive 50 Nm clamp. One run held it there for about 1.3 seconds. Another retained the full 50 Nm across approximately 2.75 seconds. The tyre was not slipping too much, so the controller stored permission to add torque.
When overslip arrived, the proportional and derivative terms reacted immediately, but the integral term had to unwind before it could help. At the worst point in one event the contributions were minus 7.6 Nm proportional, plus 37.6 Nm integral and minus 0.9 Nm derivative. The combined PID contribution was still plus 29.1 Nm while the tyre was already beyond target.
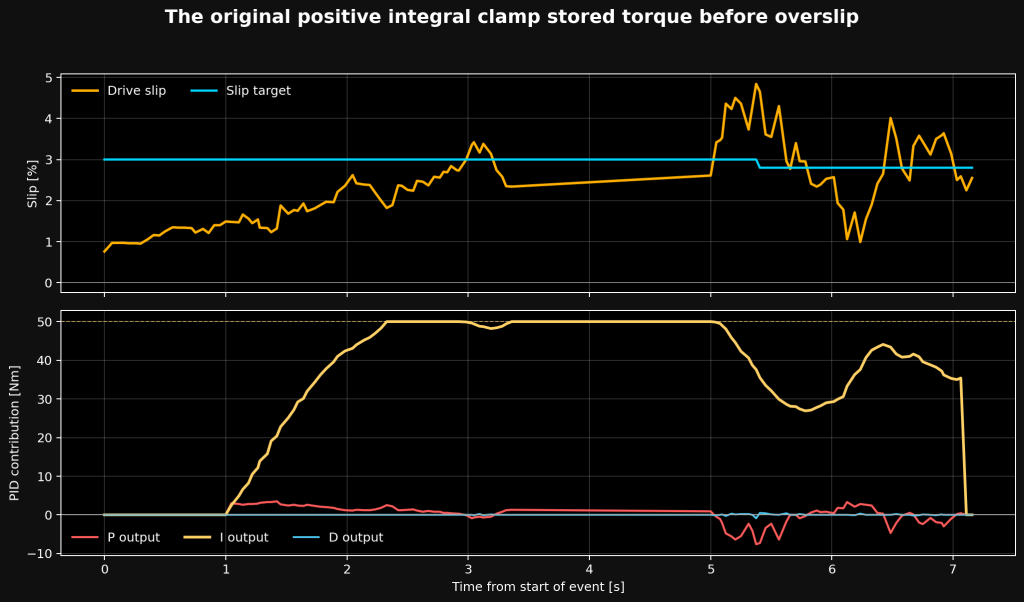
The controller remained stable because the feedforward model, throttle reduction and ignition retard were doing the real work. That does not make the integral behaviour acceptable. A stable result can still contain two control terms fighting each other.
The fix was removing positive authority
Status: Changed awaiting full dry validation
The positive integral clamp is now zero. The negative clamp remains minus 50 Nm.
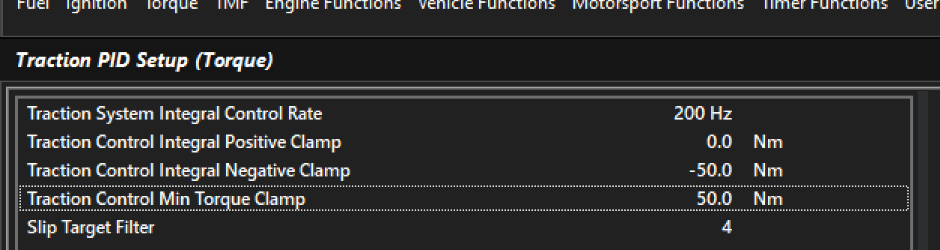
Below target slip, the integral term now sits at zero. Once the tyre exceeds target it can accumulate negative correction, up to 50 Nm. There is no positive value left to unwind and no stored torque waiting to oppose the first intervention.
I initially considered extending the negative clamp to minus 75 Nm. The logs killed that idea. In the later full throttle events the negative integrator reached only minus 4.3 Nm in one run and zero in the other. More negative authority would have solved a problem that was not happening while increasing the risk of a torque hole after the tyre recovered.
The proportional, integral gain and derivative tables therefore stay unchanged for the next test. Changing several control terms at once would make the result impossible to attribute. The positive clamp was the proven defect, so that is the change being isolated.
What the road logs now say
Status Verified for the logged conditions
| Log | Maximum boost | Target slip | Maximum WOT slip | Maximum retard | Cut |
| 03 | 26.3 psi gauge (181 kPa) | 3.0% | 4.29% | -3.6 degrees | None |
| 04 | 30.0 psi gauge (207 kPa) | 2.8 to 3.0% | 4.84% | -4.2 degrees | None |
Both runs used the conservative Mode 3 target. Neither needed ignition or fuel cuts. The car controlled the tyre with modest timing reduction and without the controller cycling torque up and down.
The lower 7,982 N tractive force result from the cooler, imperfectly dry run should not be used to rewrite the dry table. It is evidence that the available grip changed. That is exactly why the feedforward and feedback halves both exist.
The same session produced a roughly 4.8 second 100 to 200 km/h run without full boost at 100 km/h. The performance matters, but the cleaner result is the behaviour: a 914 whp pump fuel car remained controlled on a cool road without cuts or abrupt throttle closure.
Power mode and traction mode are separate decisions
Status: Verified
The torque request rotary decides how much engine performance is available. The traction rotary decides how much of that performance the tyre may use. Treating them as one setting hides useful control.
The high torque modes already allow enough demand to exceed the rear tyre in second and third, while effectively releasing full engine output from fourth upwards. Increasing those torque tables would not make the car faster. It would only give the traction strategy a larger error to remove.
For a dry road the useful combination is a high torque request with Mode 5 or Mode 6 traction control. Mode 3 is deliberately conservative. Mode 7 is now a permissive track setting rather than a 12 percent wheelspin setting dressed up as performance.
The current configuration (Emtron specific)
| Function | Current setting |
| Feedforward basis | Engine torque before reduction versus modelled tractive force |
| Dry force peak | Approximately 9,500 N working baseline |
| Mode 3 straight target | 3.0 percent |
| Mode 4 straight target | 4.0 percent |
| Mode 5 straight target | 5.5 percent |
| Mode 6 straight target | 7.0 percent |
| Integral positive clamp | 0 Nm |
| Integral negative clamp | -50 Nm |
| Integral rate | 200 Hz |
| Minimum torque clamp | 50 Nm |
| Slip target filter | 4 |
What still needs proving
The next valid test is on the same dry road, in both directions, with warm tyres. Running in both directions removes most of the gradient and steady wind error. Mode 4 should be tested first, followed by Mode 5, with full pedal held through the shift long enough to see the integrator unwind and torque recover.
The stop condition is simple. If slip rises beyond about 6.5 percent and tractive force does not increase, the tyre has crossed the peak. If force continues to rise at 5.5 percent slip, Mode 6 is doing its job. If the controller oscillates or leaves a torque hole after intervention, the PID still needs work.
Until that test is complete, the new force peak and the revised permissive modes remain evidence based working settings rather than finished calibration.
The lesson from this iteration
The first version was designed to prevent wheelspin. This version is being calibrated to maximise acceleration without making the car unpleasant.
That distinction changed the questions. How much slip is allowed is less useful than where the tyre produces maximum force. A larger integral clamp is less useful than checking whether the integrator is acting in the correct direction. More available engine torque is irrelevant when the tyre is already the limit.
The car already had enough power. The latest changes are about making the control system stop wasting it, whether that waste comes from excessive wheelspin, an over-conservative target or two parts of the PID fighting each other.
That is the point of logging it properly. The calibration stops being a table that looks sensible and becomes a system that can explain what the car actually did.
Huge thanks to Adrian at Emtron Australia for the pointers in this. It’s been invaluable.